Adding and maintaining employees is easy in Client Diary.
How to Add Basic Employee Details
See the below video showing the basics. Full details are below.
The following describes in more detail the options in the Add/Edit Details employee screen:
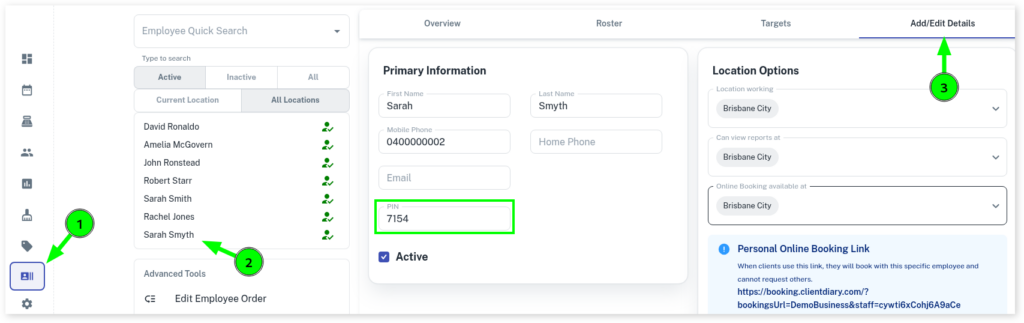
- The Primary Information is the first entries at the top of the screen. Only First Name is required. Last Name, Mobile Phone, Home Phone and Email details are optional.
- Leave the PIN option blank as Client Diary will auto assign one after you save the employee. (See below how to view the PIN number)
- The Active tick box. Ticking this means the employee can login and is active. If you want to remove an employee, untick this. You would leave this ticked when adding a new employee.
- On the right hand side you will see Location Options.
- Location working, using the drop-down, the location ticked will provide that employee with a column in the book for that location. If you want an employee to login but not have a column, leave these unticked
- Can View Reports at, using the drop-down, the location ticked will allow an employee to view reports at that location. If you don’t want an employee to view any reports, leave this unticked
- Online Booking available at, using the drop-down, the location ticked will allow an employee to be available for booking online at that location
- Inactivity Auto Logout is how long the system will sit idle before logging out. This is a handy security feature. Anywhere from 5 minutes to 10 minutes seems to be popular. Adjust to suit your own needs.
- Security Groups allows you to choose which type of employee this person is and what they can and can’t do. If this is blank it means you haven’t turned on this feature yet. Visit this lesson to turn on this feature if required.
You will notice some custom fields in the above video. These are custom to that demo database. View here on how to add custom fields.
How to View an Employees PIN
To view an employee’s PIN:
- Select the Employee menu
- Select the Employee name
- Select the Add/Edit Details tab